A roof photograph answers one question. An organized property record helps a team find that photograph, understand its setting and return to the discussion later.
Bradley uses Liberty Shield Hub to bring property imagery, available 3D resources, thermal documentation and reviewed inspection reports into a connected workflow. When included in your project, that workspace gives authorized stakeholders a practical place to review the agreed record.
Make the files useful to the people receiving them.
Start with the decision, the audience and the record your project needs.
01 / CAPTURE
Collect purposeful views.
Define priority areas and questions. Agree the photographs, footage, thermal capture and model coverage before flying.
02 / CONNECT
Orient in the property.
Use an available 3D model or walkthrough to find the roof, facade and surroundings. Liberty Shield links to the external viewing resource.
03 / REVIEW
Open the original evidence.
Move into Media Studio for photographs and video. Review thermal documentation with location, visible context where selected, and the capture question.
04 / REPORT
Read the approved record.
When reporting is included, open the reviewed inspection information and supporting documents. Keep observations and recommended follow-up clear.
05 / RETURN
Brief the next visit.
Start from the published inspection. Name the areas to revisit and questions to follow up. Agree the schedule and coverage for any new capture.
PLAN THE COVERAGE → EXPLORE THE SPACE → REVIEW THE RECORD
Give every tool a clear role.
The useful connection is the property and the question your team needs to answer.
01 / FLIGHTHUB 2
Plan and locate.
Saved area routes describe intended coverage. Existing 2D roof layers and visible-light 3D resources help locate the work within the property.
What does the route tell us?
The preview shows planned coverage and estimates. We review the actual capture and output separately before describing what was completed.
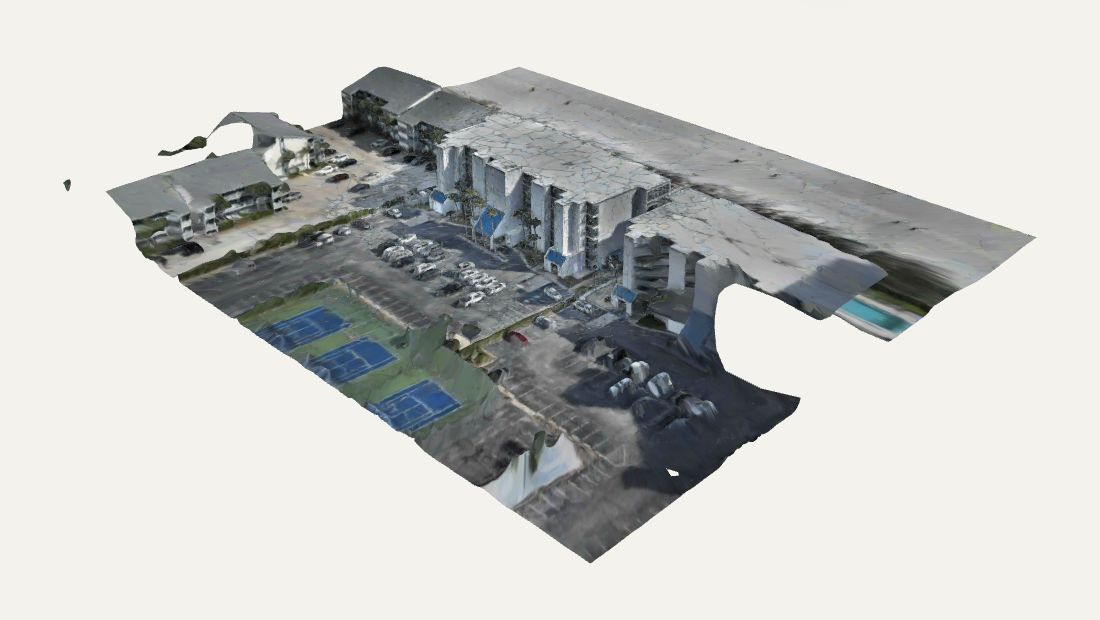
Our completed reconstructions let people explore building form, roof edges and surrounding context from different viewpoints.
When is a 3D view useful?
Use it to orient a conversation before opening a detail photograph. A visual reconstruction and a measurement deliverable have different review requirements.
Available resources are organized around the property. Your proposal defines the content and access included.
01 / PROPERTY RESOURCE
Original imagery
Open photographs and video in Media Studio. Look closely at the selected original, review the available notes and use the agreed download or sharing tools.
02 / PROPERTY RESOURCE
Spatial views
Orient with an available Polycam model, aerial reconstruction or walkthrough. These resources explain the setting before the discussion moves to an individual image.
03 / PROPERTY RESOURCE
Thermal and visible context
Review thermal images with their recorded area and available notes. Compare a selected visible-light reference when supplied; normal thermal documentation does not require every image to have a pair.
04 / PROPERTY RESOURCE
The scoped report
Find the inspection checklist, mission report or thermal report included in the assignment. Keep the reviewed document distinct from the original media it discusses.
05 / PROPERTY RESOURCE
The published version
Return to the completed inspection record for its date and scope. Additional completed visits can extend the history; scheduled follow-ups describe future work.
ORIENT → OPEN THE ORIGINAL → READ THE REPORT
Find the same area. Discuss the supporting view.
A board can begin with “Which roof area are we discussing?” and use the spatial view to orient. A contractor can ask “Which photograph supports that observation?” and review the original in Media Studio. The scoped report provides the documented review and next step.
For a later visit, ask “What should we revisit?” Use the existing inspection to prepare the new brief instead of assuming a scheduled reminder is a completed inspection.
SELECTED DETAIL / ORIGINAL PHOTOGRAPH
A separate example from our image archive. A closer source view serves a different purpose from the 3D scene above.
ORIGINAL THERMAL + VISIBLE-LIGHT CONTEXT
A pattern needs its surroundings.
A paired source capture from our archive. This is a separate assignment from the 3D model above.
THERMAL FRAME / DISPLAYED SURFACE PATTERNS
See the thermal perspective.
The thermal frame records a surface pattern at capture. Palette colors alone do not establish moisture, damage or an equipment fault.
VISIBLE-LIGHT FRAME / PROPERTY SETTING
Keep the physical context.
The corresponding visible view helps locate roof shapes and surroundings. Thermal review uses the relevant source imagery and capture conditions.
These two views have different framing. They are shown side by side, not as a pixel-aligned overlay or calibrated temperature comparison. They do not establish a defect. In the Hub, visible references are selected where appropriate; not every normal thermal image is paired.
WHEN INCLUDED IN YOUR PROJECT
Agree the handoff. Give people the right access.
Liberty Shield Hub supports property-centered media, available interactive resources, approved reports and inspection history. Client access and the content delivered through it are confirmed for the assignment.
The areas to cover and the people who will use the result.
The selected photographs, video, thermal documentation or model resources.
Whether a reviewed report, portal access or an agreed export is required.
Who can access the record, how it will be retained and any sharing restrictions.
The schedule and consistent coverage for any recurring visits.
Delivery includes records created or supplied for your project. Agree the available historical coverage before planning comparisons with earlier inspections, repairs or warranties.
Use the record for its agreed purpose.
Visual documentation supports orientation, communication and follow-up. It does not by itself establish survey accuracy, hidden conditions, structural adequacy, insurance coverage or a guaranteed diagnosis. Measurement-based or specialist conclusions require their own agreed method and qualified review.
START WITH YOUR PROPERTY
What should your team be able to find next time?
Send the city and state, property type, priority areas, intended audience and deadline. Tell us whether you need a single capture, a report and delivery workspace, or a recurring documentation plan.